Determine that the disk has been defined to the system(s)
cd /dev/mapper
[root@node01 mapper]# ls -lat | head
total 0
drwxr-xr-x 17 root root 4820 Apr 5 20:50 ..
drwxr-xr-x 2 root root 560 Apr 5 20:48 .
brw-rw---- 1 root disk 253, 24 Apr 5 20:48 mpath10
brw-rw---- 1 root disk 253, 23 Apr 5 20:48 mpath9
brw-rw---- 1 root disk 253, 22 Apr 4 09:18 oraclevg-oracle1lv
Review the characteristics of the disk to confirm selection.
[root@node01 mapper]# multipath –ll
mpath9 (360060e8010053aa0052fb05a0000001e) dm-23 HITACHI,DF600F
[size=500G][features=1 queue_if_no_path][hwhandler=0][rw]
\_ round-robin 0 [prio=-2][enabled]
\_ 0:0:1:1 sds 65:32 [active][ready]
\_ 1:0:1:1 sdu 65:64 [active][ready]
mpath10 (360060e8010053aa0052fb05a0000001f) dm-24 HITACHI,DF600F
[size=500G][features=1 queue_if_no_path][hwhandler=0][rw]
\_ round-robin 0 [prio=-2][enabled]
\_ 0:0:1:2 sdt 65:48 [active][ready]
\_ 1:0:1:2 sdv 65:80 [active][ready]
Update the cross-reference spreadsheet in Oracle Home.
[root@node01 oracle]# cat mpath_xref.txt
DATA mpath10 (360060e8010053aa0052fb05a0000001f) [size=500G]
FRA mpath9 (360060e8010053aa0052fb05a0000001e) [size=500G]
Define the disk to ASM with oracleasm.
Mark the disk using oracleasm
/usr/sbin/oracleasm createdisk DATA1 /dev/mapper/mpath9
Writing disk header: done
Instantiating disk: done
[root@node01 oracle]#
[root@node01 oracle]# /usr/sbin/oracleasm listdisks
DATA1
OCR1
OCR2
VOTE1
VOTE2
VOTE3
For single node installations the process is complete and the disk is available to ASM.
For multi node installations you must run /usr/sbin/oracleasm scandisk on the other nodes to mark the disk on each node.
[root@node02 ~]# /usr/sbin/oracleasm listdisks
OCR1
OCR2
VOTE1
VOTE2
VOTE3
[root@node02 ~]# /usr/sbin/oracleasm scandisks
Reloading disk partitions: done
Cleaning any stale ASM disks...
Scanning system for ASM disks...
[root@node02 ~]# /usr/sbin/oracleasm listdisks
DATA1
OCR1
OCR2
VOTE1
VOTE2
VOTE3
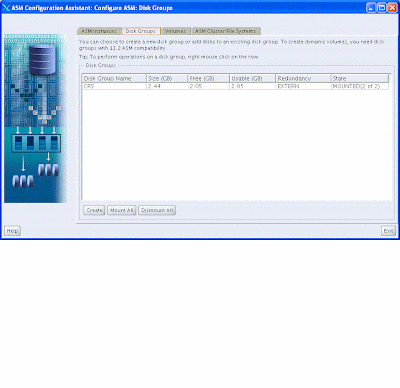
Adding the disk using ASMCA
Starting GUI
1. Login into the server as your id.
2. Cp .Xauthority myuser
3. Chmod 775 myuser
4. su – oracle or sudo su - oracle
5. Cp /home/export/olozano/myuser .Xauthority
6. Chmod 600 .Xauthority
7. Export DISPLAY=localhost:10.0
As the oracle user, source your environment to the grid software owner.
-bash-3.2$ . oraenv
ORACLE_SID = [oracle] ? +ASM1
The Oracle base has been set to /u01/app/oracle
Invoke asmca from $ORACLE_HOME/bin
$ cd $ORACLE_HOME/bin
$ ./asmca &

Right click on the Disk Group you wish to add the disk to.

Select the disk or disks you wish to add.

Once the disk is added the ASM instance will rebalance. See the appendix for a query against the ASM instance to track.
No comments:
Post a Comment